How to Set Up Cloudflare Workers AI in 5 Minutes
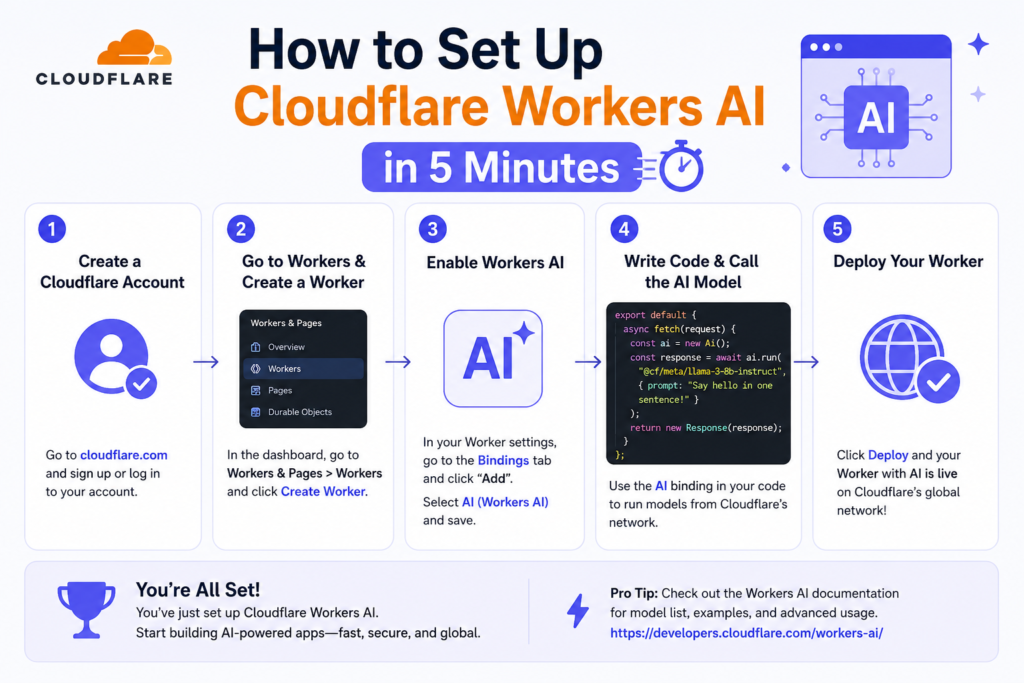
Getting Started with Cloudflare Workers AI
Want to enhance your web applications with serverless functionality? Cloudflare Workers AI lets you run code at the edge, making it faster and more efficient than traditional server setups. With this tool, you can deploy applications globally across Cloudflare’s extensive network. But what if you could do all this in just five minutes? Yes, it’s possible! This guide will walk you through the steps to set up Cloudflare Workers AI quickly and effectively.
Before diving into the setup process, let’s briefly explore what Cloudflare Workers AI is and why it’s beneficial for developers and businesses alike. Cloudflare Workers AI enables you to run lightweight scripts directly on Cloudflare’s servers. This setup reduces latency while improving performance and scalability. You can handle tasks like API requests, real-time data processing, and even personalized user experiences without the hassle of managing your own server infrastructure.
Prerequisites for Setting Up Cloudflare Workers AI
Before you can dive into setting up Cloudflare Workers AI, there are a few prerequisites you’ll need to ensure a smooth experience. First, you’ll need a Cloudflare account. If you don’t have one yet, you can sign up for free on Cloudflare’s website. Once you have your account, make sure you’re familiar with the Cloudflare Dashboard, as it will be your primary interface for managing Workers.
Another important aspect is having a basic understanding of JavaScript or WebAssembly, as these are the primary languages you’ll use to write your Workers scripts. If you’re not comfortable with coding yet, don’t worry! Cloudflare provides plenty of resources and documentation to get you started. Lastly, consider what kind of functionality you want to implement with your Worker. This could be anything from a simple API endpoint to a more complex data processing script that interacts with other services.
Creating Your First Cloudflare Worker
Once you’ve set up your Cloudflare account and familiarized yourself with the interface, it’s time to create your first Worker. Here’s how you can do this in a few straightforward steps:
- Access the Dashboard: Log into your Cloudflare account and navigate to the dashboard.
- Select Workers: On the left sidebar, click on the “Workers” option. This will bring you to the Workers section where you can manage your scripts.
- Create a New Worker: Hit the “Create a Worker” button to start a new script.
- Write Your Code: You’ll be presented with a code editor. Here, you can write your JavaScript code. For example, a simple Worker to return a “Hello World” response could look like this:
addEventListener('fetch', event => {
  event.respondWith(new Response('Hello World!'));
});
This basic script listens for incoming requests and responds with “Hello World!” You can modify this to suit your needs. This step is not just about writing code but also about understanding how your code interacts with the web. For instance, I once created a Worker that transformed incoming requests into a different format for an API I was integrating. This allowed me to seamlessly connect two different systems without needing a full server setup.
Once you’ve written your code, click the “Save and Deploy” button. Your Worker is now live and can be accessed through a unique URL provided by Cloudflare.
Testing Your Cloudflare Worker
After deploying your Worker, it’s crucial to test its functionality to ensure everything works as expected. You can do this directly from the Cloudflare dashboard. Here’s how:
- Access the Worker URL: Cloudflare provides a unique URL for your Worker. Copy this URL from the dashboard.
- Open a Browser: Paste the URL into your browser and hit enter.
- Check the Response: If everything is set up correctly, you should see the “Hello World!” message displayed in your browser.
If you don’t see the expected output, double-check your code for any errors. The Cloudflare dashboard also includes logs that can help you debug any issues. I remember the first time I deployed a Worker; I was so excited to see it live. However, I was met with an error message instead of “Hello World.” It turned out I had a small typo in my code. Debugging was easier than I thought once I started using the logs. Boost Your Sales with a WooCommerce Bulk Product Description Writer
Integrating AI Capabilities with Cloudflare Workers
One of the exciting possibilities with Cloudflare Workers AI is integrating artificial intelligence functionalities into your applications. For instance, you can connect your Worker to AI APIs, such as OpenAI or Google’s ML services, to perform tasks like natural language processing or image recognition.
To integrate AI capabilities, you’ll usually need to make API calls within your Worker. Here’s a simple example to illustrate how you might call an AI service:
addEventListener('fetch', event => {
  event.respondWith(fetch('https://api.exampleai.com/analyze', {
    method: 'POST',
    body: JSON.stringify({ text: 'Your text here' }),
    headers: { 'Content-Type': 'application/json' }
  }));
});
This snippet sends a POST request to an AI service with some text data for analysis. You can replace the URL and parameters with those specific to the AI service you choose to use. In my own experience, I connected a Worker to an AI sentiment analysis API. Not only did it provide insights into customer feedback, but it also allowed me to respond to users in real-time, enhancing their experience on my site.
Deploying Your Worker to a Custom Domain
While Cloudflare provides a default URL for your Worker, you might want to deploy it under your own custom domain for branding and user experience purposes. Here’s how you can set that up:
- Set Up Your Domain: Ensure your domain is already added to your Cloudflare account.
- Configure Routes: In the Workers section, find the “Triggers” tab. Here, you can set up a route that links your Worker to a specific path on your domain. For example, you might want your Worker accessible at
https://yourdomain.com/api/worker. - Save Changes: After configuring the routes, save your changes, and your Worker will be accessible through your custom domain.
This not only enhances the professionalism of your application but also allows you to leverage existing traffic and SEO benefits from your established domain. For instance, if you’re running an e-commerce site, having an API endpoint like https://yourdomain.com/api/products for fetching product details can significantly improve the user experience, while also providing you with valuable data on user interactions.see the full AI WordPress automation guide
Monitoring and Debugging Your Cloudflare Worker
Once your Worker is live, it’s essential to monitor its performance and address any potential issues. Cloudflare provides built-in analytics and logging features to help you keep track of your Worker’s usage and error rates.
To access analytics, go back to the Workers section of your dashboard. Here, you’ll find various metrics such as request counts, error rates, and execution times. Regularly checking these metrics can help you identify any performance bottlenecks or unexpected behavior. For example, I once noticed a spike in error rates shortly after deploying a new feature. It turned out the integration with an external API was failing due to changed parameters on their end.
If you encounter errors, the logs section will be invaluable for troubleshooting. You can view the logs in real-time as your Worker executes, allowing you to pinpoint problems quickly. Make sure to handle errors gracefully in your code to improve user experience, such as returning a friendly error message instead of a generic server error. Auto-Republish Old WordPress Content: Boost Your Traffic
Best Practices for Cloudflare Workers
To get the most out of your Cloudflare Workers, consider following these best practices:
- Keep It Simple: Aim for simplicity in your Worker scripts. Complex logic can lead to bugs and make debugging more challenging. A straightforward Worker that performs a singular function is often easier to maintain.
- Optimize Performance: Cache responses where applicable to reduce load times and API call frequency. Cloudflare’s caching features can help with this. For instance, if you’re fetching data from an external source that doesn’t change often, caching that data can save you a lot of unnecessary requests.
- Test Thoroughly: Before deploying any changes, test your Workers in various scenarios to ensure they handle different inputs correctly. Don’t just test happy paths; consider edge cases too.
- Document Your Code: Commenting on your code helps others (and your future self) understand what each part does, making collaboration easier. I’ve often found that taking the time to document my thought process during coding saves me hours in the long run.
By adhering to these practices, you’ll not only improve the reliability of your Workers but also enhance the overall quality of your applications.See pricing →
FAQs
What are Cloudflare Workers AI?
Cloudflare Workers AI allows developers to run serverless scripts at the edge, enabling faster performance and efficient resource management for web applications.
Can I use Cloudflare Workers for free?
Yes, Cloudflare offers a free tier for Workers, which includes basic features suitable for small projects and initial testing.
How do I debug my Cloudflare Worker?
You can debug your Worker using the logs available on the Cloudflare dashboard, which provide real-time insights into execution and errors.
Are there limitations to Cloudflare Workers?
Yes, there are some limitations, including execution time limits and resource constraints. It’s best to consult the official Cloudflare documentation for detailed information.
How can I improve the performance of my Cloudflare Worker?
You can improve performance by optimizing your code, using caching strategies, and minimizing API calls where possible. Additionally, consider reviewing the Google Indexing API for WordPress to understand how it can boost your SEO strategy, which indirectly influences the performance of your applications.